Showing posts with label DIY. Show all posts

Sunday, January 6, 2013

DIY #03: EMROIDERED SWEATER

This DIY project is inspired from Dolce & Gabbana FW2012 Menswear Collection. I know I can't afford to buy the real thing so the best next thing to do is to be creative <3

Hat by KENZO x NEW ERA, Sunglasses by Ray-Ban, Trench Coat by MARNI for H&M, Shirt & Cropped Pants by H&M, Shoes by DE NOVO MEN, Bag by CANON FREEBIES
I bought the wool sweater from H&M and got some metallic gold thread. I must admit, this project ain't no joke. I've spent hours and weeks (not to mention the countless needle accidents LOL) just to finished this project. But all those hard work is worth because I am really proud my work. Its not a Dolce & Gabbana masterpiece but its a piece I call my very own <3

My inspiration Dolce & Gabbana FW2012 MENSWEAR Collection

Thursday, November 1, 2012

DIY #002: Cropped Sweatshirt with emblishment

GIVENCHY for Lane Crawford Vest Shirt and DIY H&M Shirt with Black Star Patches on collar.

GIVENCHY Cropped Sweatshirt

Last month, I have blogged about my latest DIY Inspiration and today I am finally ready to show you guys my version of the GIVENCHY Cropped Sweatshirt. I decided to do this DIY project because of I don't want to wear my GIVENCHY for Lane Crawford FNO vest shirt sleeveless but still I want to showcase it's awesome print. Before we start, I'd like to thanks my thank Mom for helping me out on this project.


You'll need:
  • Sweatshirt
  • Embellishment (mine are STAR PATCH and STAR STUD)
  • Scissor
  • Curve Ruler *optional*
  • Pin, Needle and Thread
  • Sewing Machine *optional*
  • Seamstress' Chalk


Steps:
  1. Lay flat the sweatshirt on its side as possible making it side seams on the top of your work table.
  2. Start cutting the front and then back of the sweatshirt depending how low or high your desire cropped design REMEMBER to give enough space for the seam allowance and error.
  3. Fold and pin the edge of you sweatshirt this will served as your hem.
  4. Using the appropriate sewing machine start stitching the hem of you sweatshirt. In my case, I brought my sweatshirt to a professional seamstress. *Yes! I cheated a little LOL*
  5. Lay flat your desired embellishment on your now cropped sweatshirt and secure each.

Saturday, October 13, 2012

DIY Inspiration #002: GIVENCHY Cropped Sweatshirt

Photo by: Marcelo Burlon via Instagram
If you are following me on twitter or instagram you would probably know about my latest DIY inspiration. Ultimately, the source of this inspiration came from Andrew Mukamal's youtube channel, where he show how to DIY the GIVENCHY's cropped sweatshirt. Soon, I'll be posting my own version of this sweatshirt. I'm so excited to get this DIY started.


Images: Instagram
Video: Youtube

Tuesday, September 4, 2012

DIY #001: Rhinestone studded portfolio clutch bag

"I love DIY because its such a sustainable and personal approach to fashion. Plus, your project is truly, a one-off that can't be found anywhere else!" - Shini Park on DIY for H&M Magazine Summer 2012
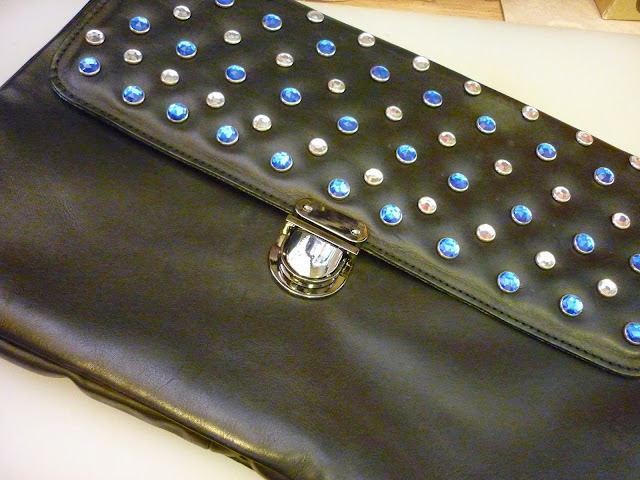
A look for less with a very personal approach <3


Who fashion conscious *fashionista* doesn't want to own a fashion pieces like the PRADA SS2012 Rhinestones studded portfolio clutch bag like I do? But let face it, not everyone *including ME* can afford to pay USD1,950.00 for a clutch bag. So instead of mopping around and feeling sad I decided to get creative and busy. And in situation like this DIY-ing comes "handy" *no pun intended* plus by doing DIY, I'm able to "re-interpret" things like this without breaking or robbing a bank while adding my very own personality on each project.

So here you guys. I hope you LIKE my very first DIY blog post  :-D

You'll need:
On this DIY project, I am using a ZARA Leather portfolio clutch bag.

  • Clasp portfolio clutch bag (it could be new, old or vintage)
  • Hammer
  • Leather Stitching Awl
  • Belt hole puncher
  • Rhinestones
  • Pencil
  • Ruler
  • Scissor *optional*

Procedures:
Step 1: Remove the lining of the portfolio clutch bag *if any*.
Step 2: Measure and mark the placement of the rhinestones.
Step 3: After marking the placement of the rhinestone start making holes on the portfolio clutch bag.
You can use a "belt hole puncher" to punch a holes around the edge of the portfolio bag.
Then use the "leather stitching awl" to punch holes on places "belt hole puncher" can't reach.
Step 4: Place the rhinestones.
Try to be creative on creating your own unique pattern and color combination <3
After that place the "base cap" on the feet of each rhinestone studs.
Step 5: Hammer each "base cap" to keep the rhinestone in place.
Try not to hammer the rhinestone too hard so it won't break or shatter.
Then... TADA!!! You have your very own creation RHINESTONE STUDDED PORTFOLIO CLUTCH BAG.

I dare you to be creative and make your very own DIY project. 


Images: Jade Shop-a-lot 

Sunday, September 2, 2012

DIY Inspiration #001: PRADA Rhinestone SS2012 studded portfolio Bag

PRADA Spring Summer 2012 Rhinestone studded Portfolio Clutch
From the day, I saw this AMAZEBALL "bedazzled" portfolio clutch bag from PRADA Menswear Spring Summer 2012 live streaming fashion show at PRADA's official website, I know it was a love at the first sight and I know want it so badly. But reality bites and it bite really hard like US$1,950.00 hard and then it  was clear that I can't afford this beauty *boohoo*. So the US$1,950.00 question is, what is best next thing I can do? Of course, it's time for me to get creative and busy DIY-ing!

Will post my actual DIY-ing of this portfolio clutch soon. So stay tune <3


Images: Lee Oliveira
Related Posts Plugin for WordPress, Blogger...